- August 26, 2022
- Posted by: MCAM Northwest
- Categories: Mastercam, Tech Tip
6 things you should do when setting up a new version of Mastercam to assure a buttery smooth transition of your settings and files.
By Callie Morgan
Friday, August 26th, 2022, 12:00 PM
Here at MCAM Northwest, we want to ensure that transitioning to a new version of Mastercam is as drama-free as possible! Our team put together a list of key things to keep in mind after installing your software to assure a smooth transition of your settings.
Note: Before installing Mastercam, make sure that your computer meets the minimum/recommended system requirements. If you need help installing Mastercam, refer to the timestamps in our “Tag You’re I.T.” webinar.
1. You Can Link Multiple Mastercam Accounts to Your License
Mastercam.com accounts give you access to forums and the Knowledge Base for Mastercam troubleshooting, and the Tech Exchange for downloading tool libraries and generic machine posts. If you haven’t done so already, make a Mastercam.com account and link it to your license! Anybody with a valid Mastercam license can get a linking code to link their Mastercam.com account. In fact, multiple users can even generate linking codes from the same seat of Mastercam, giving all programmers access to the benefits of Mastercam.com. Check out this Streamingteacher Tech Tip that shows you how to link your Mastercam.com account to your Mastercam license.
2. Migrate Your Settings and Files to a New Mastercam Version
You don’t need to start from scratch when you update to a new version of Mastercam! You can keep your customized settings, project files and more when moving to a newer version of Mastercam through the Mastercam Migration Wizard. There are different instructions, depending on how old the version you are updating from is. If the version is 1-3 versions behind the one you are updating to, check out this Streamingteacher Tech Tip on Standard Migration:
If the Mastercam version you’re updating from is more than three versions behind, refer to this Tech Tip video instead:
3. Moving a Software License to a New Computer
A common issue among our customers with software licenses is activation failing on a new computer when transferring a Mastercam license to it. With HASPs, you simply unplug them from one computer and then plug them in the next to transfer the license, regardless of whether the computer is on or off. Software licenses, however, need the computer to be on and the license to be deactivated on the current computer before activating the license on the new computer.
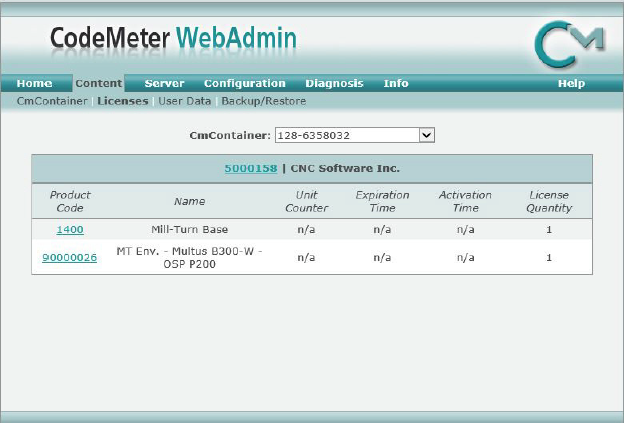
4. NetHASP License or Network Software License not working? Check your ports!
Ports are channels of communication to the internet used by Mastercam. By default, the ports used for Mastercam licensing are closed. Ports can also be closed by I.T. teams. Make sure that your I.T. team goes into your firewall/antivirus settings to make sure that those ports are opened and that Codemeter is whitelisted.
5. Do Not Uninstall CodeMeter!
CodeMeter is a license manager that protects software applications from piracy and reverse engineering. When you install a Mastercam software license, it also installs CodeMeter on your computer. CodeMeter is required in order to run Mastercam.
6. It’s Okay to Change the Location of the Shared Mastercam Folder
The “Shared” Mastercam folder contains data that we may want to share with other Mastercam Programmers, (e.g. Machine Definitions, Posts, Machine Simulation, Tool Libraries, etc.). The “My Mastercam” folder contains data that is unique to the Mastercam programmer.
If your Mastercam Shared Folder isn’t in an ideal location on your computer, you can change its location. Here are the steps to changing the location of the Shared Folder:
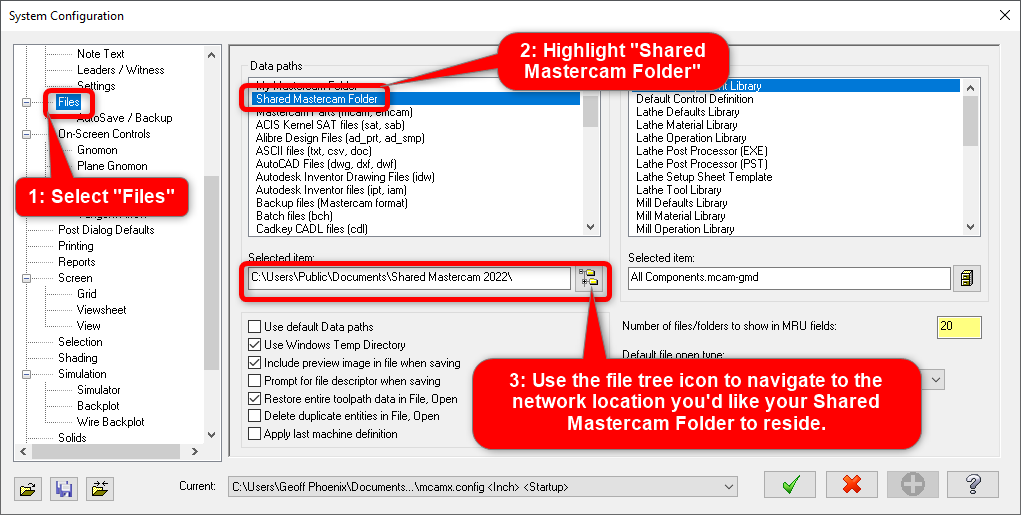
Step 1: Select “Files”
Step 2: Highlight “Shared Mastercam Folder”
Step 3: Use the file tree icon to navigate to the network location you’d like your shared Mastercam Folder to reside.
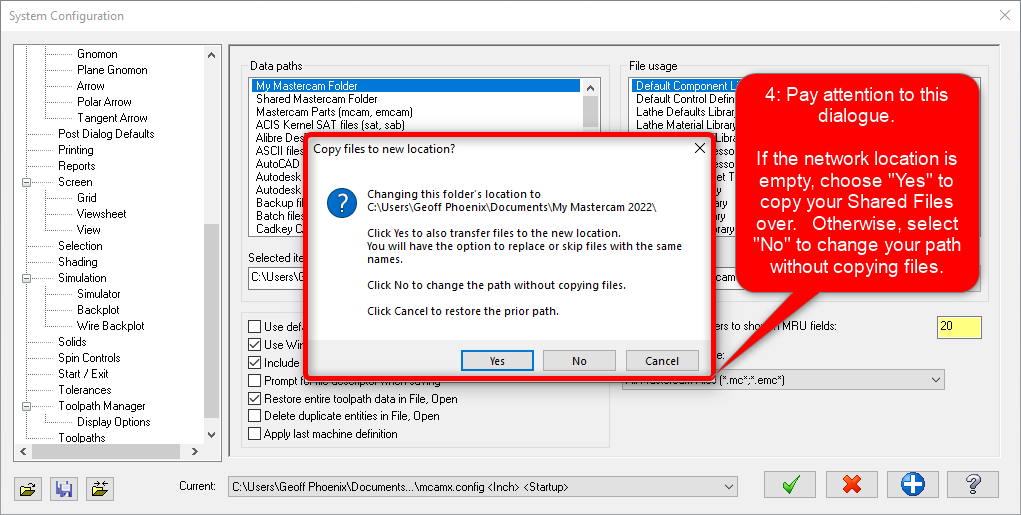
Step 4: Pay attention to the dialogue window that pops up. If the network location is empty, choose “Yes” to copy your Shared folder. Otherwise, select “No” to change your path without copying the files.
If you have any issues when setting up Mastercam, we have many resources for you!
- Our “Tag You’re I.T.!” webinar is available on YouTube with timestamps for installing/activating specific license types, system requirements and more.
- Streamingteacher has a video lesson group called “Common Support Issues” that you can access by creating a free account on the site. These videos cover installation/activation of various Mastercam license types and solutions to common installation issues.
- If the videos links above don’t address your installation question, please don’t hesitate to reach out to our Support Team at support@mcamnw.com or call (503) 653-5332!
Follow MCAM Northwest!
Facebook: @MCAMNorthwest
LinkedIn: mcam-northwest
Twitter: @MCAM_NW
YouTube: The MCAM Northwest
To view and register for upcoming MCAM Northwest Mastercam webinars, visit our Events page.