- June 2, 2020
- Posted by: MCAM Northwest
- Categories: Mastercam, Tech Tip
In the event that you outsource part production to another vendor, we offer 6 important things to keep in mind before sending out your Mastercam project files in this MCAM blog.
June 2nd, 2020, 8:30 AM
By Tim Rowley
You can create a Mastercam project that can be used with one brand, model or controller and another brand, model or controller, as long as they use the same kinematics. However, even when the project appears to be an exact match to the brand/model/controller that the other party is using, there are other factors that can hinder the success of a project file transfer. To ensure a successful transfer of your Mastercam project files to another party, there are six factors that you should consider when building your file transfer process.
1. Consider the Mastercam Version
There are distinct advantages to staying completely current, as many issues are resolved with every update. If the outside vendors are using the same Mastercam version as the provider, this means that there will be direct file compatibility. Mastercam files can be migrated from an older system to a newer system, but it is impossible to open newer files in an older system with the toolpaths. When opening older files in a newer version, the following message will appear:
![]()
Simply save the file to migrate it.
The best practice is for both parties to roll out the Mastercam Interim Releases (Version 2020 Update 1,2,3, etc.) and Major Releases (ie; 2020, 2021, etc.) at the same time. After installation, the Migration Wizard will update all of the support files, posts, tool libraries, configuration, simulators, etc. The Mastercam project is automatically migrated when you open it for the first time in the new version.
A group training strategy could benefit everybody by sharing what the team has learned about the new Mastercam version and how to take advantage of the new technologies. Streamingteacher is a great resource for self-guided remote learning of Mastercam. The site also includes a Team subscription option.
2. Mastercam Structure Standardization (Template)
A starter file in Mastercam can contain many standards to speed up the programming process and can be very helpful when multiple users are accessing the same file, as the structure becomes very consistent. Starter files contain the following items.
Level Numbers
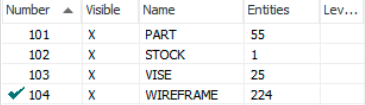
Define standard level numbers for specific purposes.
Custom Plane Names
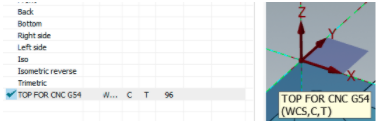
Plane naming conventions can help someone who didn’t create the planes understand their purpose.
View Sheet Tabs

View sheets can be stored in your template to quickly call up specific graphic views, zoom, attributes, planes, section views, and much more. Think of this as an automation tool.
Geometry Attributes (color, line style, thickness, shading style)

Geometry attributes can help speed up identification. For example, containment boundaries are always color white, dashed line type.
Operation Standards
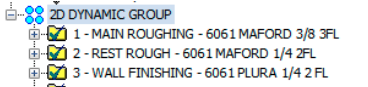
Operations can be stored in the template. The naming conventions will be critical to being able to locate the specific operations needed.
Cutting Tool Standards
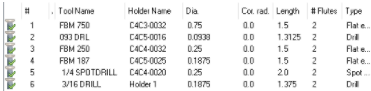
Cutting tool definitions can be stored in the template. Naming conventions are critical to being able to locate the specific tools needed.
3. Post-Processor Structure
It is very beneficial to have all of the post processors involved developed by the same provider. Some post authors use different variables and structure, which can complicate the portability between machines, requiring additional steps to toggle the various features in the Mastercam machine options.
4. CNC Physical Limits and Limitations
Cutting conditions kept with the limits of all CNCs and stored in the Mastercam tool definitions, such as SFM – Spindle Speed and FPT – Feed Rates,
width of cut and depth of cut, are set in the Mastercam operation itself. The combination of these settings will determine horsepower consumption, which, ideally, will never exceed what all CNCs are capable of. Most modern cutting strategies require less horsepower, making this easier to accomplish. All cutting, reference positions, entry and retract motion need to be kept in range of all CNCs involved. Machine simulation provides feedback for out of range x,y,z,a,b points. However, Backplot and Verify do not.
Flood, Through Tool, Mist or high pressure air combinations for machine coolant should match to avoid the need to rework to accommodate each machine. Also, high pressure air is commonly used for dynamic milling in Steels. That should also be set up as a coolant option when having your post developed.
High speed milling options, DWO, TCPC can be toggled on as needed, but must be consistently set between all CNC machines. Minimum and maximum arc radius should be set to the range that works with all of the machines, which is set in the Toolpath Filter settings. Pallet shuttles, and many other components of the CNC machine, can be adapted at the vendor’s site.
5. Workholding & Fixturing
If the workholding is the same for the destination machine, include it in the Mastercam source file and reference the workholding as needed during the programming process. If the workholding is different, it will still be beneficial to see how the work holding was taken into consideration during the initial programming. The new workholding can be swapped in.
6. Check for Error Messages
After the vendor receives the file, open the Mastercam project and swap in the new machine definition using Machine Group Properties. Address any error messages that relate to out of range features, x,y,z, tool numbers or non-existent options. Save the Mastercam project file with a name that indicates that it has been adapted. Select all operations and change NC file name and program number to meet vendor’s requirements, which will typically be the same as the project name.
If graphical toolpath editing was used, those operations may need to be unlocked, re-edited and regenerated. This is rarely used. Save the Mastercam file. Run Verify or Machine Simulation to check for collisions, post process the NC file and create the Setup Sheet.
Follow MCAM Northwest!
Facebook: @MCAMNorthwest
LinkedIn: mcam-northwest
Twitter: @MCAM_NW
YouTube: The MCAM Northwest
To view and register for upcoming MCAM Northwest Mastercam webinars, visit our Events page.